Creating your own concrete planters can be a rewarding project that adds a personal touch to any garden or living space. With just a few materials and some simple steps, anyone can craft unique planters that stand out. This guide will provide clear instructions on how to make beautiful DIY concrete planters that are perfect for any home.
The process of making concrete planters is not only straightforward but also allows for creativity in design. Whether choosing molds or shaping them by hand, individuals can customize their planters to fit their style. From understanding the right mix of concrete to ensuring proper drainage, this article will cover all essential aspects to ensure success.
With this step-by-step guide, readers will gain the confidence to embark on their concrete planter project. Each stage is designed to be easy to follow, making it perfect for beginners and seasoned crafters alike. Ultimately, making a concrete planter can enhance any space while providing a satisfying DIY experience.
Materials and Tools Required for Concrete Planters

Creating DIY concrete planters requires some basic materials and tools. Here’s what is needed:
Materials:
- Concrete mix: A high-quality mix provides durability.
- Water: Essential for mixing with the concrete.
- Container molds: Plastic or cardboard containers are common.
- Straw: A small piece for creating drainage holes.
- Cooking oil: To grease the molds for easy removal.
Tools:
- Mixing bucket: For combining concrete and water.
- Shovel or trowel: Used to mix and pour the concrete.
- Rubber gloves: For protecting hands while working.
- Utility knife: For cutting molds if necessary.
- Level: To ensure the planter surface is even.
Optional Tools:
- Sandpaper: For smoothing rough edges after removal.
- Measuring cup: For accurate water measurements.
- Protective eyewear: To safeguard eyes from dust.
Gathering these materials and tools in advance makes the process smoother. With everything ready, it becomes easier to follow the steps for making concrete planters.
Designing Your Concrete Planters

When creating a concrete planter, choosing the right shape and size is crucial. Additionally, designing a mold that matches your vision can help ensure the final product turns out as expected. Both aspects will influence the planter’s aesthetic and functionality.
Choosing the Right Shape and Size
The shape and size of the planter depend on the plants it will hold and the space available. For instance, larger plants may need wider, deeper pots. Common shapes include round, square, and rectangular.
- Round Planters: Great for small to medium plants. They distribute weight evenly.
- Square Planters: Ideal for modern designs and smaller spaces.
- Rectangular Planters: Work well for window sills or narrow areas.
Select a size that allows for proper drainage and enough soil for root growth. Measure the intended space to ensure the planter fits well.
Creating a Mold
Creating a mold is essential for shaping the planter. Molds can be made from various materials, but silicone molds are popular for their flexibility.
- Gather Materials: Use a sturdy plastic container for the outer mold and a softer silicone form for the inner part.
- Assemble the Mold: Place the silicone mold inside the plastic container. Make sure it is centered.
- Secure the Molds: Use tape or clamps if necessary to keep the molds in place. This prevents shifting during the concrete pouring.
Properly preparing the mold helps achieve clean edges and a smooth surface. It is important to make sure the mold is secure and allows for easy removal once the concrete sets.
Mixing the Concrete

Mixing concrete is a crucial step in creating durable planters. The right selection and mixing technique can ensure strong, long-lasting results.
Selecting the Concrete Mix
Choosing the right concrete mix is essential for successful planter making. There are different types of mixes available, including pre-packaged mixes and homemade options.
For beginners, pre-packaged concrete mixes are often recommended. They provide ease of use, as they come with precise instructions. Popular options include countertop mix and general-purpose concrete mix, which offer a good balance of strength and workability.
If someone prefers a DIY approach, mixing cement with sand is an option. This involves using 2 parts cement to 3 parts sand. Be sure to select quality materials to get the best results.
Correct Ratios and Consistency
Correct ratios and consistency are key to mixing concrete properly. The right water-to-cement ratio helps to achieve the desired strength. Generally, less water is better, as it results in a stronger mix.
For example, when using a pre-packaged mix, follow the manufacturer’s instructions closely. Typically, a half-bag of mix will need about half a gallon of water. The mixture should reach a consistency similar to that of cooked oatmeal.
If creating a homemade mix, add water gradually. Start with a small amount, then add more as needed. Aim for a thick, workable texture, as this will enhance the final product’s durability and appearance.
Pouring and Curing the Concrete

This stage involves preparing the mold, pouring the concrete mix, and ensuring it cures properly. Each step is crucial for creating strong and durable planters.
Assembling the Mold
Before pouring, he must assemble the mold properly. Using a sturdy outer mold and an inner mold is typical for creating a planter. He can find ready-made silicone molds that are easy to use. These molds are reusable and help achieve consistent shapes.
The outer mold holds the concrete, while the inner mold shapes the inside. He should apply a release agent, like cooking oil or spray, to the inside of the outer mold. This makes removing the planter easier after curing.
He must ensure that the molds fit tightly to avoid leaks. Checking for any gaps can save time later.
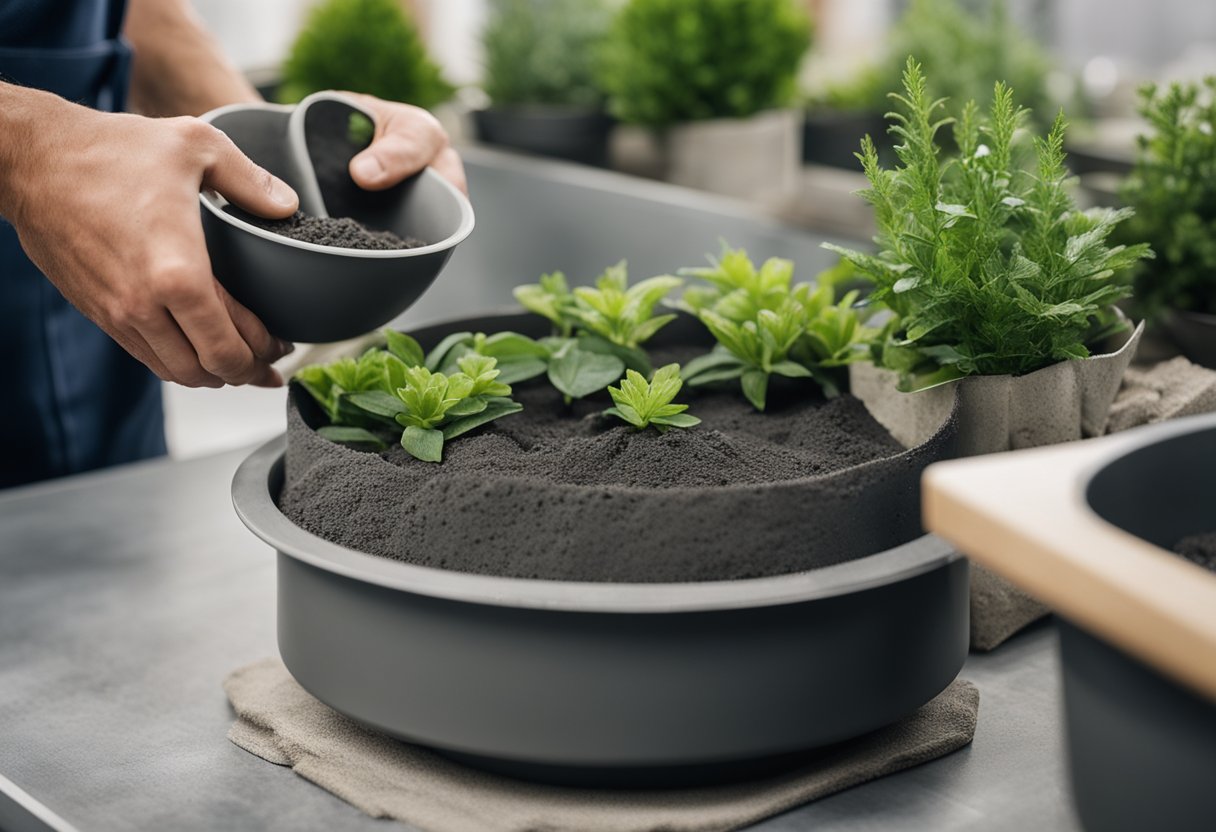
Pouring the Mix into the Mold
Once the mold is ready, it is time to pour the concrete mix. He starts by preparing the concrete according to the package instructions, typically mixing concrete with water until it reaches a smooth, thick consistency. The goal is to achieve a texture similar to a milkshake.
He should pour the mix slowly into the outer mold. He stops about two inches from the top to leave space for the inner mold. It’s important to jiggle and tap the mold gently to remove any air bubbles that could weaken the structure.
Using gloves and safety glasses is advised during this step to ensure safety while handling wet concrete. He must work quickly, as concrete begins to set fast.
Curing Process
The curing process is essential for strong concrete. After pouring, he will set the molds aside for 24 to 48 hours in a safe location. Keeping the concrete moist during this time is critical.
He can cover the molds with plastic wrap or a damp cloth to retain moisture. This helps the concrete cure evenly and prevents cracking.
After 24 hours, he can check the concrete. If it feels firm, he can carefully remove the molds. If not, it’s best to wait a little longer. Proper curing results in a sturdy planter that will last for years.