Resin coasters have become increasingly popular in recent years, and for good reason. They are a fun and easy DIY project that can add a pop of color and personality to any home decor. By adding dried flowers to the mix, you can create a unique and beautiful piece that is both functional and aesthetically pleasing.
Making colorful resin coasters with dried flowers is a simple process that requires only a few materials and some patience. The first step is to gather the necessary supplies, including resin, hardener, a silicone mold, and dried flowers. Once you have everything you need, you can mix the resin and hardener according to the manufacturer’s instructions and pour it into the mold. After the resin has set for a few minutes, you can add the dried flowers on top and let it cure for several hours. The end result is a beautiful and one-of-a-kind coaster that you can use or give as a gift.
Materials Needed
To make colorful resin coasters with dried flowers, you will need the following materials:
- Resin and hardener: A two-part resin and hardener kit is required to make the coasters. The amount of resin and hardener needed depends on the size and number of coasters you plan to make. Follow the manufacturer’s instructions for the correct ratio of resin to hardener, and mix the two components thoroughly.
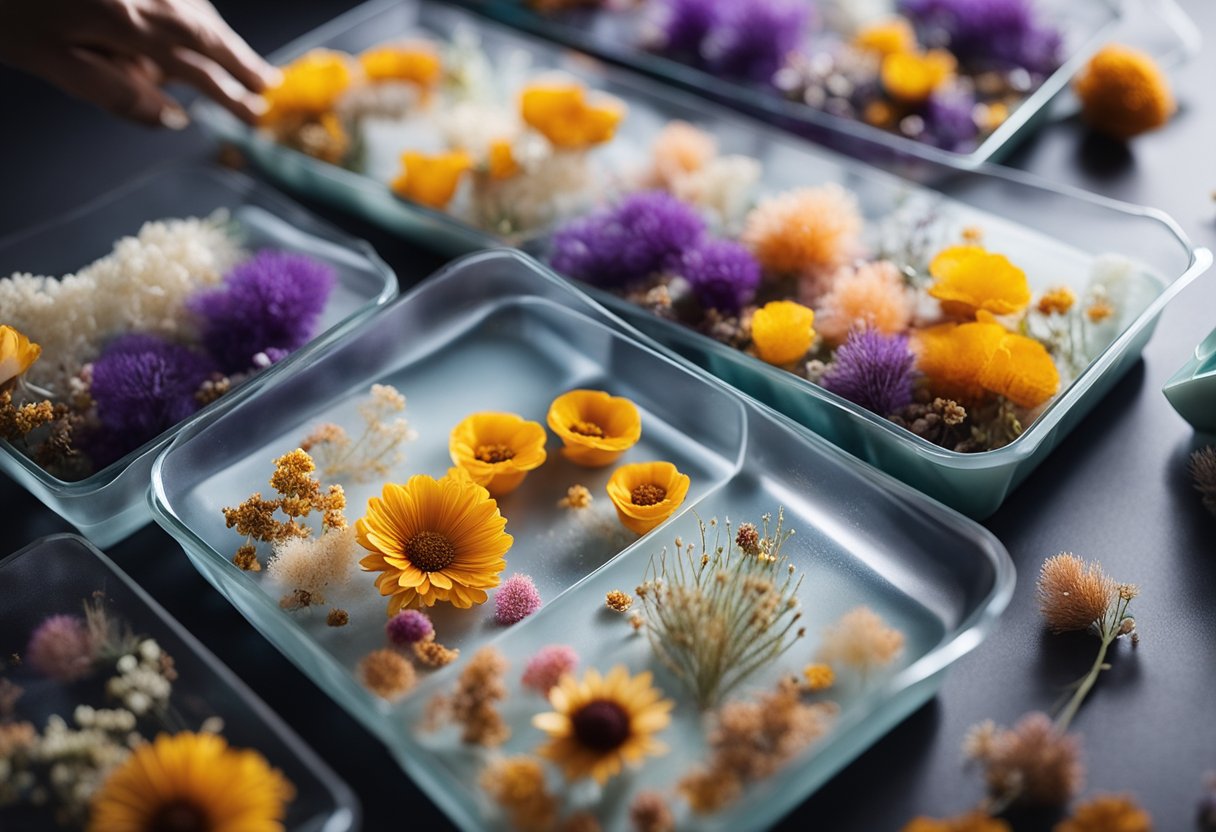
- Dried flowers: Small dried and pressed flowers are recommended for this project. You can either press your own flowers, or buy a set of assorted dried and pressed flowers. Make sure the flowers are completely dry before using them in the resin.
- Coaster molds: You will need silicone molds to pour the resin into. The size and shape of the molds will depend on the size and shape of the coasters you want to make. Make sure the molds are clean and dry before using them.
- Mixing cups and stirrers: Use plastic or silicone measuring cups and stirrers to mix the resin and hardener. Do not use paper cups or wooden stirrers, as they can contaminate the resin.
- Gloves: Wear disposable gloves to protect your hands from the resin and hardener.
- Protective gear: Wear protective eyewear and a mask to avoid inhaling the resin fumes.
- Heat gun or torch: Use a heat gun or torch to remove any air bubbles that may form in the resin.
- Mica powder or liquid pigment: Use mica powder or liquid pigment to add color to the resin. Choose colors that complement the dried flowers you plan to use.
- Rubbing alcohol or acetone: Use rubbing alcohol or acetone to clean the mixing cups and stirrers after use.
Follow the manufacturer’s instructions for each of these materials to ensure that you use them safely and effectively. With the right materials and a little bit of patience, you can create beautiful and unique resin coasters with dried flowers.
Safety Precautions

When working with resin, it is important to take certain safety precautions to avoid any health hazards. Here are some tips to keep in mind:
- Work in a well-ventilated area: Resin emits fumes that can be harmful when inhaled. It is important to work in a well-ventilated area to avoid breathing in the fumes. Open windows and doors, and use a fan to improve air circulation.
- Wear protective gear: It is recommended to wear protective gear such as gloves, goggles, and a respirator mask when working with resin. This will protect your skin, eyes, and lungs from any harmful chemicals.
- Avoid skin contact: Resin can cause skin irritation and allergic reactions. It is important to avoid skin contact by wearing gloves and long sleeves. If you do get resin on your skin, wash it off immediately with soap and water.
- Keep resin away from food and drinks: Resin is not safe for consumption. It is important to keep it away from any food or drinks to avoid accidental ingestion.
- Follow manufacturer’s instructions: Each type of resin may have different instructions for mixing and curing. It is important to carefully read and follow the manufacturer’s instructions to ensure safety and proper use.
By following these safety precautions, you can ensure a safe and enjoyable resin crafting experience.
Design Planning and Preparation

Before making colorful resin coasters with dried flowers, it’s important to plan and prepare the design. Here are some tips to help you create beautiful coasters:
Choose the Right Flowers
The first step in designing your resin coasters is to choose the right flowers. You can use any type of flower, but it’s important to make sure they are completely dry before adding them to the resin. You can either dry your own flowers or buy a set of assorted dried and pressed flowers.
Select a Color Scheme
Once you have your flowers, it’s time to select a color scheme. You can choose colors that complement or contrast with the flowers, or use a monochromatic color scheme. It’s important to choose colors that will work well together and enhance the beauty of the flowers.
Prepare the Molds
Before mixing the resin, prepare the molds. You can use silicone molds or make your own using a mold-making kit. Make sure the molds are clean and dry before adding the resin.
Mix the Resin
Follow the resin manufacturer’s instructions to mix the resin and hardener. It’s important to mix the resin thoroughly to ensure a smooth and even finish. You can add a small amount of pigment to the resin to create a colored base for the flowers.
Add the Flowers
After the resin has been mixed, it’s time to add the flowers. Use tweezers to place each flower onto the top of the resin until you achieve the desired design. You can add as many or as few flowers as you like, but make sure they are evenly spaced and not too close together.
Let the Coasters Cure
Once the flowers have been added, let the coasters cure for at least 24 hours. This will ensure that the resin is completely dry and hard before removing the coasters from the molds. Once the coasters have cured, remove them from the molds and enjoy your beautiful, colorful resin coasters with dried flowers.
Preparing Dried Flowers

Before starting the resin coaster project, it is important to prepare the dried flowers properly. Here are the steps to follow:
- Choose the Flowers: The first step is to select the flowers that you want to use for the project. You can either purchase a set of assorted dried and pressed flowers or press your own flowers. Some popular flowers for this project include roses, daisies, lavender, and pansies.
- Clean the Flowers: Once you have selected the flowers, it is important to clean them thoroughly. Use a soft-bristled brush to gently remove any dirt or debris from the flowers.
- Trim the Flowers: Next, trim the flowers to the desired size. You can either leave them whole or cut them into smaller pieces.
- Arrange the Flowers: Arrange the flowers in a pleasing manner. You can create a pattern or simply scatter them randomly.
- Press the Flowers: To ensure that the flowers stay flat and do not stick up from the resin, it is important to press them. Place the flowers between two sheets of parchment paper and press them with a heavy book or object for several hours.
By following these steps, you can prepare the dried flowers for the resin coaster project and ensure that they look beautiful and stay in place.
Mixing Resin and Hardener

Measuring Components
Before mixing resin and hardener, it is essential to measure the components accurately. The wrong ratio of resin and hardener can result in an incomplete cure or a sticky, tacky surface. Most resin kits come with a measuring cup or syringe, which makes it easy to measure the components.
However, if the kit does not have a measuring tool, use a digital scale to weigh the components. The ratio of resin and hardener varies depending on the brand and type of resin. Therefore, it is crucial to follow the manufacturer’s instructions for the correct ratio of resin and hardener.
Mixing Technique
Mixing the resin and hardener is a critical step in making resin coasters with dried flowers. Improper mixing can result in an uneven cure or a sticky surface. To ensure a smooth and even mixture, follow these steps:
- Pour the resin and hardener into a mixing cup or container.
- Use a wooden stick or a silicone spatula to mix the components thoroughly. Scrape the sides and bottom of the container to ensure all the components are mixed.
- Mix the components for at least two minutes. If the components are not mixed correctly, the resin will not cure completely.
- After mixing the components, pour the mixture into a new cup and mix it again. This step helps to ensure that the components are mixed thoroughly.
- Let the mixture sit for a few minutes to allow any bubbles to rise to the surface. Use a heat gun or a torch to remove any bubbles that remain on the surface.
By following these steps, you can ensure that the resin and hardener are mixed correctly, resulting in a smooth and even surface for your resin coasters.
Adding Color to Resin

Resin coasters can be made in a variety of colors, and incorporating dried flowers into the design can add an extra pop of color. Here are some tips for selecting and incorporating colors into your resin coasters.
Selecting Colors
When selecting colors for your resin coasters, consider the color of the dried flowers you will be using. You can choose colors that complement or contrast with the flowers. For example, if you are using dried purple flowers, you might choose a light blue or pink resin color to complement the flowers, or a bright yellow or green to create a contrasting effect.
You can also use metallic or iridescent pigments to add shimmer and shine to your coasters. These pigments come in a variety of colors and can be mixed with the resin to create a unique look.
Incorporating Colors
To incorporate color into your resin coasters, mix the resin and hardener according to the manufacturer’s instructions and then add the pigment. You can use liquid or powder pigments, depending on your preference.
If you are using liquid pigments, add a few drops to the resin and mix well. If you are using powder pigments, mix the powder with a small amount of resin before adding it to the rest of the mixture.
When adding color to your resin, start with a small amount and add more as needed. You can always add more pigment, but it’s difficult to remove it once it’s been added. Mix the resin and pigment thoroughly to ensure that the color is evenly distributed throughout the mixture.
Overall, adding color to resin coasters is a fun and creative way to make your coasters stand out. By selecting complementary or contrasting colors and incorporating metallic or iridescent pigments, you can create a unique and eye-catching design.
You can also read about Double Duty Living Room Storage: Maximizing Space with Smart Solutions
Assembling the Coaster Mold

Before pouring the resin, it’s important to assemble the coaster mold properly. Here are the steps to follow:
- Prepare the mold: Make sure the mold is clean and dry before use. If necessary, wipe it down with a damp cloth and let it dry completely.
- Arrange the dried flowers: If you’re using dried flowers, arrange them inside the mold in the desired pattern. You can use tweezers to position them exactly where you want them.
- Mix the resin: Follow the manufacturer’s instructions to mix the resin and hardener in the correct ratio. Stir the mixture thoroughly to ensure that the resin and hardener are completely combined.
- Pour the resin: Slowly pour the resin mixture into the mold, taking care not to overfill it. If you’re using a silicone mold, you can gently tap it on a flat surface to help release any air bubbles that may have formed.
- Add more dried flowers (optional): If you want to add more flowers or other decorative elements to the coaster, you can do so at this point. Simply arrange them on top of the resin and gently press them down.
- Let the resin cure: Depending on the type of resin you’re using, it may take several hours or even days for the resin to cure completely. Follow the manufacturer’s instructions for curing time and temperature.
Once the resin has cured, you can remove the coaster from the mold and admire your handiwork. With a little bit of practice, you can create beautiful and unique resin coasters that make great gifts or home decor items.
Pouring the First Resin Layer

To start making colorful resin coasters with dried flowers, the first step is to mix the resin and hardener according to the manufacturer’s instructions. Typically, the ratio of resin to hardener is 1:1, which makes it easy to measure out equal parts of each.
Once the resin and hardener are mixed, pour the mixture into a larger plastic cup. Use a stir stick to mix the resin thoroughly, scraping the sides and bottom to ensure that the mixture is well combined.
Before pouring the resin into the mold, make sure that the dried flowers are arranged the way you want them. Using tweezers, gently place the flowers onto the bottom of the mold.
Carefully pour the resin mixture into the mold, making sure to cover the flowers completely. Use a stir stick to spread the resin evenly throughout the mold.
It is important to note that the resin will self-level, meaning that it will spread out evenly on its own. However, if there are any areas that need more coverage, use a stir stick to gently spread the resin to those areas.
Once the mold is filled with resin, let it sit for about 15 minutes to allow any bubbles to rise to the surface. Use a heat gun or a kitchen torch to remove any remaining bubbles.
After the first layer of resin has cured, it is time to move on to the next step in creating colorful resin coasters with dried flowers.
Arranging Dried Flowers

Once the resin is poured into the mold, it’s time to arrange the dried flowers. It’s important to have the flowers ready before pouring the resin, as the resin will start to harden quickly.
Small dried and pressed flowers work best for this project. You can either press your own flowers or buy a set of assorted dried and pressed flowers online or at a craft store.
Using tweezers, carefully place each flower onto the top of the resin until you achieve the desired look. You can create a pattern or scatter the flowers randomly.
It’s important to ensure that the resin completely covers the flowers. Use a toothpick to gently submerge any flowers that are not fully covered. When flowers are not submerged, they tend to float up to the surface.
Once the flowers are arranged, let the resin cure for at least 24 hours. This will ensure that the coasters are fully hardened and ready to use.
Arranging dried flowers is a simple but important step in making colorful resin coasters. With a bit of creativity and patience, you can create beautiful and unique coasters that are perfect for your home or as a gift.
Pouring the Final Resin Layer

Once the dried flowers are in place, it’s time to pour the final layer of resin. This layer will seal the flowers in place and give the coasters a smooth, glossy finish.
To prepare the resin, mix equal parts of resin and hardener in a mixing cup and stir for 2-3 minutes. Be sure to scrape the sides and bottom of the cup to ensure that the mixture is well combined.
Once the resin is mixed, pour it slowly and evenly over the dried flowers. Use a stir stick or toothpick to spread the resin to the edges of the coaster and to ensure that the flowers are completely covered.
It’s important to work quickly when pouring the resin, as it will start to harden within 20-30 minutes. If you notice any bubbles in the resin, use a heat gun or a torch to gently remove them.
Allow the resin to cure for at least 24 hours before removing the coasters from the molds. Once they are fully cured, carefully remove the coasters from the molds and sand any rough edges with fine-grit sandpaper.
And with that, your colorful resin coasters with dried flowers are complete! They make a beautiful addition to any home and are sure to impress your guests.
You may also like to read about Must-Know Considerations: Should You Replace Your Tub with a Shower?
Curing the Resin

Once the resin has been poured onto the coasters, it needs to be cured. Curing is the process of hardening the resin into a durable and long-lasting coating. The curing time varies depending on the type of resin used, the thickness of the layer, and the ambient temperature and humidity.
Most resins require at least 24 hours to cure fully. During this time, it is important to keep the coasters in a dust-free and level area. Any dust or debris that lands on the resin during curing will be permanently embedded in the surface. Additionally, if the coasters are not level, the resin may pool and create an uneven surface.
It is a good idea to cover the coasters with a dust cover or a box to protect them from any accidental bumps or touches. After the initial 24 hours of curing, the coasters can be gently touched to see if they are tacky or sticky. If they are still tacky, they need more time to cure.
Once the coasters are fully cured, they can be removed from the molds. Carefully remove the coasters from the molds by gently bending the sides away from the resin. If the coasters are still stuck, use a silicone mold release spray to help loosen the resin.
In conclusion, curing the resin is an essential step in creating beautiful and durable resin coasters with dried flowers. It is important to follow the manufacturer’s instructions for curing time and to keep the coasters in a dust-free and level area during curing. With proper curing, the coasters will be ready for use and enjoyment for years to come.
Unmolding and Finishing Touches

Removing from Mold
Once the resin has cured, it’s time to remove the coasters from the mold. Carefully flex the mold to release the coaster. If the coaster doesn’t come out easily, try gently twisting the mold to loosen it. Be careful not to apply too much pressure, as this can cause the coaster to crack or break.
Sanding Edges
After unmolding the coaster, you may notice some rough edges or imperfections. To smooth out the edges, use a fine-grit sandpaper. Start with a low-grit sandpaper and work your way up to a higher grit. Be sure to sand the edges evenly to avoid creating an uneven surface.
Polishing the Coaster
To give the coaster a glossy finish, use a polishing compound. Apply a small amount of the compound to a soft cloth and gently buff the coaster. Be sure to apply even pressure to avoid creating uneven spots.
With these finishing touches, your colorful resin coasters with dried flowers are complete and ready to use. Display them in your home or give them as a thoughtful gift to a friend or loved one.
Troubleshooting Common Issues

Making resin coasters with dried flowers can be a fun and rewarding DIY project, but it can also come with its fair share of challenges. Here are some common issues that may arise during the process and how to troubleshoot them:
Issue: Resin is not curing properly
If the resin is not curing properly, it could be due to a few different factors. First, make sure that you are following the manufacturer’s instructions for mixing the resin and hardener. If the ratio is off, it can affect the curing process. Additionally, make sure that you are mixing the resin and hardener thoroughly and for the recommended amount of time.
If the resin is still not curing properly, it could be due to the temperature and humidity in the room. Resin cures best in a warm, dry environment. If the room is too cold or too humid, it can affect the curing process. Try moving the project to a warmer, drier location.
Issue: Bubbles in the resin
Bubbles in the resin can be frustrating, but they are a common issue. To prevent bubbles, make sure that you are mixing the resin and hardener thoroughly and slowly. Additionally, try to work in a warm, dry environment to reduce the risk of bubbles forming.
If bubbles do form, there are a few ways to remove them. First, you can use a heat gun or torch to gently heat the surface of the resin. This will cause the bubbles to rise to the surface and pop. Alternatively, you can use a toothpick or needle to pop the bubbles manually.
Issue: Flowers are not sticking to the resin
If the flowers are not sticking to the resin, it could be due to a few different factors. First, make sure that the resin is still tacky when you add the flowers. If the resin has already cured, the flowers will not stick. Additionally, make sure that the flowers are completely dry and free of any moisture.
If the flowers are still not sticking, you can try using a small amount of clear glue to attach them to the resin. Alternatively, you can try placing the flowers on the resin and then pouring a thin layer of resin over the top to seal them in place.
By troubleshooting these common issues, you can ensure that your resin coasters turn out beautifully and are a great addition to your home decor.
You may also like to read about How to Upholster a Headboard and Frame: A Step-by-Step Guide
Maintenance and Care of Resin Coasters

Resin coasters are a beautiful addition to any home decor, but they require proper care to maintain their beauty and functionality. Here are some tips on how to take care of your resin coasters:
Cleaning
To clean your resin coasters, simply wipe them with a damp cloth. Avoid using harsh chemicals or abrasive materials that can scratch the surface of the coasters. If your coasters have accumulated dirt or grime, you can use a mild soap solution to clean them. Rinse the coasters thoroughly with water and dry them with a soft cloth.
Avoid Extreme Temperatures
Resin coasters are sensitive to extreme temperatures. Avoid placing hot cups or plates directly on the coasters as the heat can cause the resin to warp or melt. Similarly, do not expose the coasters to extreme cold temperatures as the resin can become brittle and crack.
Store Properly
When not in use, store your resin coasters in a cool, dry place away from direct sunlight. Avoid stacking the coasters as the weight can cause them to warp or crack.
Resealing
Over time, the resin coating on your coasters may become dull or scratched. To restore the shine, you can reseal the coasters with a new layer of resin. Follow the manufacturer’s instructions carefully and ensure that the resin is mixed properly before applying it to the coasters.
By following these simple tips, you can ensure that your resin coasters remain beautiful and functional for years to come.