Pinterest is a popular platform for discovering and sharing ideas, particularly for home decor. However, creating a Pinterest-inspired space can come with a hefty price tag. Fortunately, there is a way to achieve the same look without breaking the bank. By making life-size Pinterest boards that double as wall decor, you can create a personalized and inexpensive space that reflects your style.
One way to make life-size Pinterest boards is by using foam board or poster board and printing out images from Pinterest to create a collage. This method is budget-friendly and allows for customization based on personal preferences. Additionally, the boards can be easily swapped out or updated as styles change or new inspiration is found.
Another option for creating life-size Pinterest boards is to use fabric or wallpaper to cover a large piece of cardboard or foam board. This method allows for a more cohesive look and can add texture to the space. Additionally, fabric or wallpaper can be found at a variety of price points, making it a flexible option for any budget.
Understanding Pinterest Boards

Pinterest is a social media platform that allows users to share and discover new ideas, recipes, fashion, and more. One of the key features of Pinterest is the ability to create boards, which are essentially virtual bulletin boards that users can use to save and organize content that they find interesting.
When creating a Pinterest board, users can choose a title and description that reflects the theme or topic of the board. They can also choose whether to make the board public or private, and whether to invite others to collaborate on the board.
Users can add pins to their boards by either uploading an image or by using the Pinterest browser extension to save content from around the web. Pins can be organized within a board by rearranging them or by creating sections within the board.
Pinterest boards can be a great way to organize inspiration for a project, plan a vacation, or keep track of recipes. They can also be used to showcase a personal style or aesthetic, or to curate content around a specific topic or theme.
Overall, Pinterest boards are a versatile and customizable tool that can be used in a variety of ways to help users discover and organize new ideas and inspiration.
Materials and Tools Required

Making life-size Pinterest boards is easy and inexpensive, but it requires a few materials and tools. Here are the things you will need to create your own life-size Pinterest boards:
Materials
- Plywood sheets: You will need large plywood sheets to create the base of your Pinterest boards. The number of sheets you need will depend on the size of your wall and the size of the boards you want to create. Measure your wall and decide on the size of your boards before heading to the hardware store.
- Fabric: Choose a fabric that matches your decor and complements the color scheme of your room. You will use the fabric to cover the plywood sheets and create a smooth surface for pinning.
- Batting: Batting is a soft material that provides cushioning and texture. It will help your pins stay in place and prevent them from falling off the board.
- Staples: You will need a staple gun and staples to attach the fabric and batting to the plywood sheets.
- Pins: Finally, you will need pins to attach your photos, notes, and other items to the Pinterest boards. Choose pins that match the color of your fabric or complement your decor.
Tools
- Saw: You will need a saw to cut the plywood sheets to the desired size. If you don’t have a saw, you can ask the hardware store to cut the sheets for you.
- Staple gun: A staple gun is essential for attaching the fabric and batting to the plywood sheets. Make sure you have enough staples for the job.
- Measuring tape: Use a measuring tape to measure your wall and the plywood sheets before cutting them. This will ensure that your boards fit perfectly on the wall.
- Scissors: You will need scissors to cut the fabric and batting to the right size.
- Level: A level will help you ensure that your boards are straight and even when you hang them on the wall.
With these materials and tools, you can create your own life-size Pinterest boards that double as inexpensive wall decor.
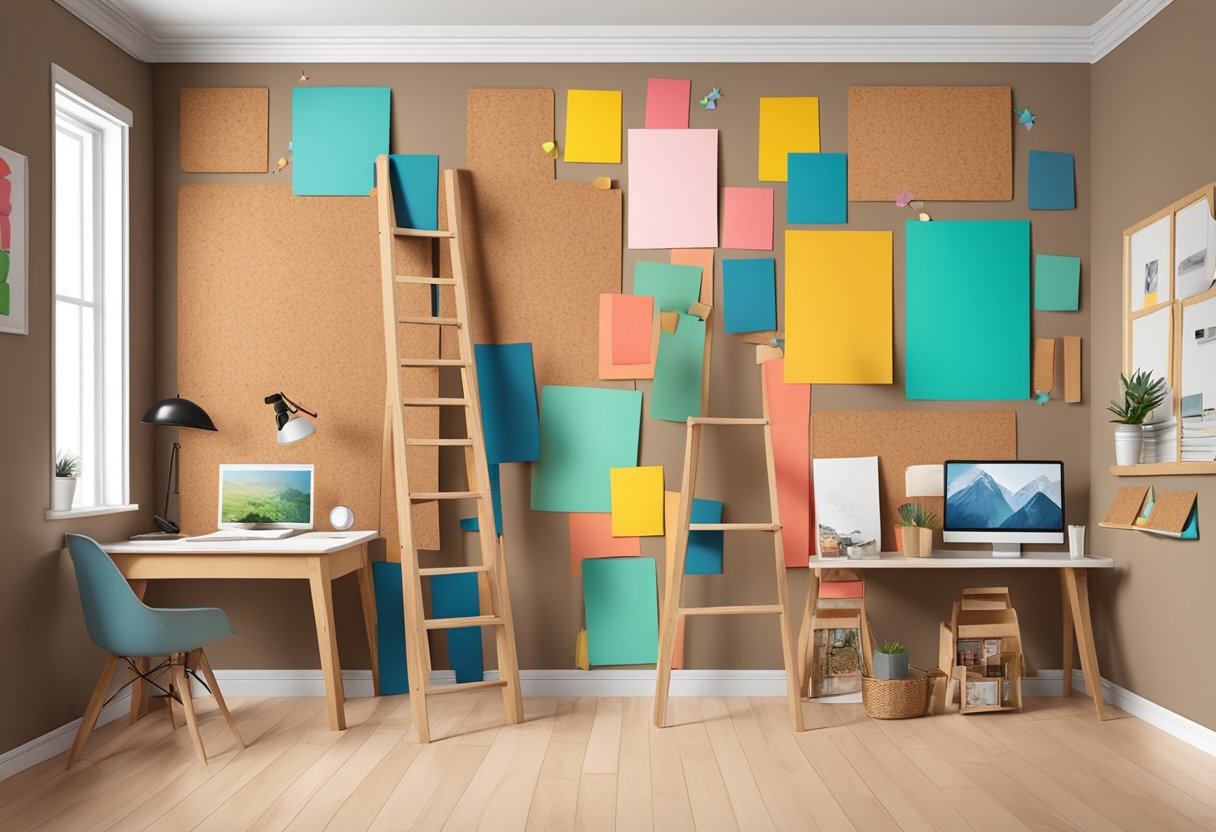
Designing Your Pinterest Board Layout
Designing your Pinterest board layout is an essential part of creating your life-size Pinterest board. First, consider the purpose of your board. Is it for inspiration, organization, or decoration? Once you have determined the purpose, you can start thinking about the layout.
One popular layout is the grid layout, where each pin is the same size and arranged in a grid pattern. This layout is great for showcasing a collection of similar items or for creating a clean and organized look.
Another layout to consider is the waterfall layout, where pins are arranged in a cascading pattern. This layout is ideal for displaying a mix of different sized pins and creating a dynamic and visually interesting board.
When designing your board, consider the color scheme and overall aesthetic. Use colors that complement each other and create a cohesive look. Also, consider the placement of each pin. Arrange them in a way that tells a story or creates a flow.
To make your board even more visually appealing, consider adding text overlays or graphic elements to your pins. This can help emphasize certain pins or add context to your overall board.
Overall, designing your Pinterest board layout is a fun and creative process. Don’t be afraid to experiment with different layouts and styles until you find the perfect one for your board.
Printing High-Resolution Images

When it comes to creating life-size Pinterest boards, printing high-resolution images is crucial. High-resolution images are sharp, clear, and have a higher pixel density, which ensures that the image is crisp and detailed even when printed in a larger size.
To print high-resolution images, it is recommended to use a digital camera or DSLR to create high-quality photos with precise exposure, focus, and zoom. This ensures that the images are captured in the highest possible resolution. Once the images are transferred to the computer, they can be edited and prepared for printing.
It is important to note that the recommended aspect ratio for a standard pin is 2:3 (e.g., 1000×1500 pixels). This size is optimal as it’s large enough to attract attention while fitting perfectly within the Pinterest feed without getting truncated.
To ensure that the images are printed in high-resolution, it is recommended to use a professional printing service or a high-quality printer with the right paper and ink. This will ensure that the colors are vibrant and the details are sharp, making the life-size Pinterest board look stunning and realistic.
In summary, to print high-resolution images for life-size Pinterest boards, it is recommended to use a digital camera or DSLR to capture high-quality photos with precise exposure, focus, and zoom. The recommended aspect ratio for a standard pin is 2:3, and it is important to use a professional printing service or a high-quality printer with the right paper and ink to ensure that the images are printed in high-resolution with vibrant colors and sharp details.
Preparing the Wall for Installation

Before installing life-size Pinterest boards on the wall, it is important to prepare the wall surface properly. This will ensure that the boards adhere well and stay in place for a long time.
The first step is to remove any furniture and electrical devices from the room and take down any fixtures or decor from the walls. This will give you a clear and unobstructed view of the wall surface.
Next, lay down drop cloths to protect your floor and baseboards from any damage or stains that may occur during the installation process.
Once you have cleared the area, it is time to clean the walls well and remove any existing wallpaper. Use warm water and a mild detergent to clean the walls thoroughly. If there are any stubborn stains or marks on the walls, use a sponge or cloth to scrub them off gently.
After cleaning the walls, repair any nicks or holes using a spackle or plaster. Once the spackle is dry, sand the wall surface so that it is smooth and even. This will ensure that the boards adhere well to the wall surface.
Finally, it is recommended to use a primer to prepare the wall surface before installing the life-size Pinterest boards. The type of primer to use will depend on the type of wall surface. If you have drywall or plasterboard, it is recommended to use a primer. On the other hand, if you have a concrete or brick wall surface, it is recommended to use a size.
By following these simple steps, you can ensure that your life-size Pinterest boards adhere well to the wall surface and stay in place for a long time.
Assembling the Life-Size Pinterest Board

Once you have gathered all the necessary materials, it is time to assemble the life-size Pinterest board. Here are the steps to follow:
- Lay the foam board on a flat surface. Make sure it is clean and free of any debris.
- Place the batting on top of the foam board. Make sure it is centered and smooth out any wrinkles or bumps.
- Lay the fabric on top of the batting. Again, make sure it is centered and smooth out any wrinkles or bumps.
- Fold the edges of the fabric over the back of the foam board and staple it into place. Start with the top edge, then the bottom, and then the sides. Make sure to pull the fabric tight as you staple to avoid any sagging.
- Once the fabric is securely attached, trim any excess fabric or batting with scissors.
- (Optional) Add any decorative elements to the board such as ribbon, tassels, or trim. This can add a personal touch and make the board more visually appealing.
- Hang the board on the wall using adhesive strips or picture hangers.
With these simple steps, anyone can create a life-size Pinterest board that doubles as inexpensive wall decor. It is a great way to showcase inspiration and add a personal touch to any room.
Mounting and Securing the Boards

Once the life-size Pinterest boards are complete, the next step is to mount them securely onto the wall. There are several ways to do this, depending on the size and weight of the boards, as well as the type of wall they will be mounted on.
One option is to use picture hanging strips, which are a quick and easy way to mount the boards without damaging the wall. These strips come in various sizes and can hold different weights, so it’s important to choose the right size and weight capacity for the boards. To use the strips, simply attach them to the back of the boards and then press them firmly onto the wall.
Another option is to use screws and anchors to mount the boards directly onto the wall. This method is more secure and can hold heavier boards, but it requires more time and effort. To use this method, first determine the location of the studs in the wall using a stud finder. Then, drill pilot holes into the boards and attach them to the wall using screws and anchors.
It’s important to ensure that the boards are level and evenly spaced before mounting them onto the wall. To do this, use a level and measuring tape to mark the location of each board and ensure that they are spaced evenly apart. Additionally, it’s important to follow the manufacturer’s instructions for any mounting hardware used to ensure that the boards are mounted securely and safely.
Overall, mounting and securing the life-size Pinterest boards is an important step in creating a stylish and inexpensive wall decor. By choosing the right mounting method and following the manufacturer’s instructions, anyone can create a beautiful and functional display for their home or office.
Decorative Elements and Finishing Touches

Once the life-size Pinterest boards are up on the wall, it’s time to add some decorative elements and finishing touches to complete the look. Here are some tips to help make the boards look even more impressive:
1. Add Greenery
Plants are a great way to add some life and color to the boards. Hanging plants, such as ivy or pothos, can be draped over the edges of the boards for a natural and organic look. Alternatively, potted plants can be placed on shelves or tables in front of the boards.
2. Incorporate Lighting
Lighting can be used to highlight the boards and create a cozy atmosphere. String lights or fairy lights can be draped over the boards, while table lamps or floor lamps can be placed nearby to provide additional lighting.
3. Use Mirrors
Mirrors can be used to reflect the boards and create the illusion of more space. A large mirror can be hung on the wall opposite the boards, or smaller mirrors can be placed strategically around the room.
4. Add Textures
Textures can be used to add depth and interest to the boards. A woven tapestry or macrame wall hanging can be hung on the wall next to the boards, while a fluffy rug or cozy throw blanket can be placed on a nearby chair or sofa.
5. Display Artwork
Artwork can be used to complement the boards and tie the room together. A large canvas painting or framed photograph can be hung on the wall next to the boards, while smaller prints or posters can be placed in frames and displayed on shelves or tables.
By incorporating these decorative elements and finishing touches, the life-size Pinterest boards will become a focal point in the room and add a personal touch to the decor.
Maintenance and Updating Your Boards

Once you have created your life-size Pinterest boards, it is important to keep them maintained and updated to ensure they continue to look great on your wall.
One important aspect of maintenance is keeping the boards clean. Dust and dirt can accumulate on the fabric and batting, making the boards look dingy and dull. To clean the boards, simply use a lint roller or a soft brush to remove any debris.
Another way to keep your boards looking fresh is to update the content on them regularly. This can be done by adding new pins to the boards or rearranging the existing ones to create a new look. It is also important to keep the titles and descriptions of the boards up to date, as this will help users find the content they are looking for.
To make updating your boards easier, consider creating a schedule for when you will add new content or rearrange the pins. This will ensure that your boards stay fresh and interesting, and that users will continue to engage with them.
Overall, maintaining and updating your life-size Pinterest boards is an important part of keeping them looking great on your wall. By following these simple tips, you can ensure that your boards continue to be a source of inspiration and beauty for years to come.
Tips for Cost-Effective Decorating

Decorating a space can be a fun and exciting process, but it can also be expensive. Fortunately, there are many cost-effective ways to decorate your space without breaking the bank. Here are some tips to help you create a beautiful and stylish space on a budget:
1. DIY Artwork
Creating your own artwork is a great way to add a personal touch to your space and save money at the same time. There are many DIY art projects that are easy to do and require minimal supplies. For example, you can create a gallery wall using inexpensive frames and printing out your favorite photos or quotes. You can also create your own abstract art using paint and canvas.
2. Repurpose Items
Repurposing items is a great way to save money and add character to your space. For example, you can turn an old ladder into a bookshelf, or use an old window frame as a picture frame. Look for items at thrift stores, flea markets, or even in your own home that can be repurposed into something new and unique.
3. Use Plants
Plants are a great way to add color and life to your space without spending a lot of money. You can buy plants at a local nursery or even at a grocery store. Look for plants that are easy to care for, such as succulents or snake plants. You can also create your own terrarium using a glass jar and some rocks or moss.
4. Use Pinterest Boards
Pinterest boards are a great way to get inspiration for your space and find cost-effective decorating ideas. You can create your own Pinterest boards and save ideas that you like. You can also search for boards created by others and get inspiration from their ideas.
By following these tips, you can create a beautiful and stylish space without spending a lot of money. With a little creativity and some DIY skills, you can create a space that is both functional and beautiful.
Safety Considerations

When making life-size Pinterest boards, it is important to take safety considerations into account. Here are a few tips to ensure that the process is safe and injury-free:
1. Wear Protective Gear
When using a staple gun or any other sharp tools, it is important to wear protective gear such as gloves and safety goggles to prevent any accidents or injuries.
2. Use a Stable Surface
When stapling the batting and fabric onto the board, make sure to use a stable surface to prevent the board from moving around. This will also ensure that the staples are securely fastened onto the board.
3. Be Mindful of Sharp Edges
When cutting the batting and fabric, be mindful of the sharp edges and handle the tools with care. It is also important to keep the tools out of reach of children and pets.
4. Watch Your Fingers
When stapling the batting and fabric onto the board, be careful not to accidentally staple your fingers. It is recommended to use a staple gun with a safety lock feature to prevent accidental firing.
By following these safety considerations, anyone can create a beautiful and safe life-size Pinterest board that doubles as inexpensive wall decor.
Alternative Uses for Your Life-Size Boards

Life-size Pinterest boards are not just for wall decor. There are many other creative ways to use them in your home or office. Here are a few ideas:
1. Vision Board
A vision board is a visual representation of your goals and dreams. You can use your life-size board to create a vision board by pinning images and quotes that inspire you. Hang it in your bedroom or office to remind you of your aspirations.
2. Memory Board
A life-size board can also be used as a memory board. Print out your favorite photos and pin them to the board to create a collage of memories. This is a great way to display your favorite moments and keep them close to you.
3. Inspiration Board
An inspiration board is a collection of images and quotes that inspire you. Use your life-size board to create an inspiration board by pinning images and quotes that motivate you. Hang it in your workspace to keep you inspired throughout the day.
4. Menu Board
If you love to cook, you can use your life-size board as a menu board. Print out your favorite recipes and pin them to the board. You can also use it to write down your grocery list or meal plan for the week.
5. Chore Chart
If you have kids, you can use your life-size board as a chore chart. Print out chore cards and pin them to the board. You can also use it to write down your family’s schedule for the week.
These are just a few ideas for alternative uses for your life-size Pinterest board. Get creative and find ways to use it that work for you!